Recently I’ve been doing a mix of Grignards, Wittigs ,and alkyl lithium preps, necessitating quite a few titrations. At the start I was dreading the (imagined) work involved, but in truth the process is quite painless.
Everything needed for the Grignard reagent titration.
Step 1. Pick a procedure.
There are a large number of different reagents that have been used at one time or another for organometallic titrations, each with their own pros and cons. I prefer diphenylacetic acid for alkyl lithium (nBuLi, etc.) titrations and iodine/lithium chloride for Grignard reagent titrations. If you want a one-size fits all approach, I2/LiCl will work for RMgX, RZnX, and primary/aromatic organolithium reagents.
Step 2. Dry and load your glassware.
As in most small scale reactions, these titrations are best run in a 4 mL sample vial. Dry the vial (stir bar optional) in a 130 degC oven overnight before use, then cool in a desiccator. The vials I use can contain the smell of isocyanides, so I consider them air-tight.
When the vial is dry, add 50 mg of either diphenylacetic acid or I2. Iodine will react with the septa, and so should be titrated that day. In vial under argon solid diphenylacetic acid is stable for prolonged periods, so I recommend preparing a few samples well in advance.
Step 3. Add the solvent.
For the diphenylacetic acid titration, freshly distill or dry under molecular sieves tetrahydrofuran. Under argon flow, add one millilitre to the vial and stir/shake until the indicator is dissolved.
For the iodine titration, add 42.3 grams of LiCl to 200 mL dry THF (adjust the scale as needed). Stir for one day, then add 40 grams of 3A molecular sieves. Store sealed, away from light or moisture [1]. As above, add one millilitre of this mixture to the indicator.
Step 4. Titrate
While the organolithium bottle is under argon, insert a 1 mL syringe. Draw up gas three times, each time emptying the plunger over a small beaker of either n-butanol or isopropanol 3]. Draw up 0.3-0.8 mL of organometallic solution, carefully determining the volume. Once the reagent has been measured, draw up a further 0.2-0.3 mL of gas, then withdraw the needle such that this argon blanket sits between the tip of the needle and the solvent [4].
Maintaining this orientation, insert the needle into the vial and expel the argon blanket. Carefully add the organometallic reagent one drop at a time, checking for either the appearance (diphenyl lithium) or absence (I2) of colour. To ensure that the full quantity of reagent enters the THF solution, place the needle on the wall of vial, roughly 3 mm above the solvent.
When you are approaching the primary endpoint, slow the rate of addition. When the colour just persists/vanishes, record the volume of reagent added. Dispose of the remainder by slowly adding it to the beaker of butanol/isopropanol, then further quench the waste beaker via slow addition of ethanol or methanol.
The iodine solution goes from brown to red before its final cloudy, colourless endpoint.
Diphenylacetic acid ends at a light yellow colour. A white precipitate may be visible.
Mass of the indicator is in milligrams, volume of the stock is in millilitres. With most syringes this value is accurate to two significant figures, though if necessary a Hamilton syringe can be used to give three sig. figs. If precise concentrations are required take the average of three titrations.
MW diphenylacetic acid: 212.24 g/mol
MW Iodine: 253.81 g/mol
Step 6. Cleanup
Both titrations can be quenched with methanol, then disposed in standard organic waste. Be careful with the lithium chloride solution, as LiCl is a potent skin sensitizer.
[1] Like all ethers THF forms peroxides on standing. Check for peroxides annually with a starch/iodide test strip, and dispose of any positive samples.
[2] For Grignards and nBuLi I use a disposable 1 mL BD insulin syringe, with 22 G needle. For tBuLi or other highly flammable reagents I recommend a dedicated teflon/glass syringe, like these ones sold by chemglass. Dry the teflon syringe in a vacuum desiccator before use, never heat.
[3] Always keep a bottle of sand nearby for small organometallic spills and a fire extinguisher within reach for larger fires. Reorganize the fumehood so that flammable solvent bottles (especially diethyl ether) are far from the area in which you are working.
[4] This prevents the reagent from reacting with air or dripping from the tip. Either situation can cause a fire under the wrong circumstances.
I’m just going to leave this here, for the next time I (or anyone else) want to determine the in-tube concentration of an NMR sample.[1,2]
Solvent
[Residual] in mM
Acetic Acid-d4
27.1
Acetone-d6
2.30
Acetonitrile-d3
13.1
Benzene-d6
9.52
Chloroform-d
25.1
Dimethylsulfoxide-d6
2.38
Methanol-d4
12.7
Pyridine-d4
14.8
Tetrahydrofuran-d8
7.78
Toluene-d8
5.94
Water-d2
145
Values are derived from this formula:
1000*(1-X)*d/(MW*Y)
x = the posted deuterium purity (ie. “99.8%” CDCl3)
y= number of hydrogen/deterium atoms per molecule.
d = density of the deutero solvent.
MW for residual solvent (ex. CHD3O for methanol)
Sieves are a beautiful invention, as I’ve said before. At 10-20% w/v, 3A molecular sieves will dry every common solvent except acetone as well or significantly better than a solvent still [1, 2]. A bottle of sieves/solvent is also far less likely to catch on fire and is far cheaper to maintain (no argon or water lines).
Unfortunately, sieves are shipped saturated with water and must be dried before use. Sieves actually absorb water at 120 degC, so a conventional drying oven is not up to the task.
Conventional wisdom is that heating to 300 degC or greater at atmospheric pressure will dry sieves, and this temperature can be reduced somewhat under vacuum [3]. Experimentally I had some success heating to ~200 degC overnight in a vacuum oven, but was never quite sure that the sieves were fully active [4].
Holding the sieves at 350 degC for 3.5 hours is the right amount of overkill. While this is a temperature out of reach of most drying ovens, it barely hits “medium” on the temperature setting of a glassblower’s annealing oven.
That’ll do.
When drying sieves go for economy of scale. Large recrystallization dishes will hold up to about 4 kg at a time (190×100 mm), and have the advantage of being ~1.5 cm smaller in diametre than an average size glass desiccator. Once they’ve been activated let the sieves cool to ~150 degC in the annealing oven, then transfer them over. Take care to fill the desiccator with drying agent to at least the height of the inner glass studs, as contact between the hot recrystallizing dish and cold ceramic/glass will almost certainly shatter one or both.
Take care to cover the glass baffles (left) with drierite. The recrystallization dish should fit within the dessicator without touching the sides (right).
Active sieves can be stored in any convenient glass container, provided the lid is well sealed. Double wrapped parafilm works well, sufficient to keep the sieves active for at least six months.
[1] Sieves are mildly basic, which triggers aldol reactions in acetone and can decompose some compounds. For example, after prolonged storage (8-10 months) of triethylamine over 3A sieves I’ve noticed a yellow discolouration in the solvent, likely due to formation of diethylamine.
[2] Larger sieves are recommended for the drying of some solvents (ie. 5A for pyridine). The difference in final water concentration is pretty negligible though, and the larger sieves can trap solvents like methanol, reducing their utility.
[3] Flame drying in a roundbottom flask under vacuum was standard approach when I arrived in Alberta, but was good for only small quantities.
[4] How to determine if molecular sieves are active: Place a small quantity on a gloved hand, and add roughly two volume equivalents of water. If the sieves are fully active they will become too hot to hold, even through the glove.
Toluene will azeotropically remove most solvents, except toluene. A good hivac pump is gold.
Potassium t-butoxide can be purified by dissolving in tetrahydrofuran, then filtering off the solid KOH. 25 g of KOtBu will dissolve in 100 mL THF.
The best source of perfectly dry DMSO is usually a fresh bottle or ampoule of D6-DMSO.
That thing in your oil bath is probably a thermocouple, not a thermometre.
You usually don’t have to go through the university library to access a paper off-campus. Most libraries funnel their off-campus traffic through a proxy server, and you can just copy the redirect from your browser’s history. Add the redirect after the .com of the journal site, but before whatever comes after.
There’s a lot of inaccurate science in movies, but one of the most prevalent is the “Hollywood Acid” trope. One drop of Hollywood acid is enough to melt a fist-sized whole in the floor, with the acid then continuing down to the level beneath [1, 2]. These acids have similar effects on steel and plastic, and only the original, unsealed, glass container is immune.
The toon variant of Hollywood Acid (at 10:00):
Fascinating as Hollywood acids are, you won’t find one at the corner store. Incredibly strong acids have been prepared in the lab, but no acid is going to be able to eat through multiple molar equivalents of concrete.
With that in mind, what is—in real life—the most dangerous acid one is likely to come across? I’m tempted to say Piranha, but given its incredible toxicity Hydrofluoric Acid takes the prize.
Background
HF(aq) is no stranger to fiction, with a prominent (and largely accurate) appearance in the second episode of Breaking Bad [3, 4]. In real life you’re most likely to come across HF in an old-school peptide synthesis lab or a materials chemistry lab (where it can be used to clean aluminum and etch niobium), or in railcars outside the local oil refinery or aluminum smelters.
While it will react violently with silicon compounds (ie. glass), with a pKa of 3.2 at first HF doesn’t seem particularly dangerous (the first pKa of citric acid is 3.09) [5]. However, the relatively low acidity keeps dissociation in water low, allowing the fairly lipophilic acid to deeply penetrate human flesh.
Once in the body the proton half of HF is free to react with tissue, and so unlike stronger acids (HCl, H2SO4, etc.) HF burns from the inside out. Tissue damage can’t be stopped by simply rinsing the site of contact, and at HF concentrations below about 50% there won’t necessarily be any overt signs of injury until long after the initial exposure (NSFL). Like many caustic agents HF can also deaden the nerves, for a time blocking pain.
Bad as this sounds, the true danger of HF doesn’t come from acidic burns, but from the simple fluoride ion. Fluoride binds strongly to calcium, to the extent that it can draw Ca2+ from our bones [6]. If untreated, hypocalcemia is more dangerous than the burns, as it can lead to heart failure. The insoluble fluoride salts themselves also cause damage wherever they form, clogging vessels and tearing tissue.
As a bit of a bonus, the low pKa allows HF to vaporize easily. Unlike Hollywood acid the vapors are highly toxic.
Using HF Safely
<disclaimer>I haven’t had the pleasure of working with concentrated HF myself. These recommendations are based on publiclyavailablesafetyinformation.</disclaimer>
Any work involving HF should be conducted in the fumehood, especially when working with concentrated (50%+) solutions. Safety goggles, not safety glasses, should be worn (for the cautious, a face shield is also advisable). Thick, elbow length nitrile gloves are recommended, or properly sealed, thick, wrist-length gloves. A chemically resistant (ie. PVC) sleeved apron should be worn over the standard lab coat. Closed-toe shoes are obviously a must, and never work with HF alone [7].
Calcium gluconate (1-2.5%) should always be kept on hand, even when simply transporting HF containers.
In all cases of exposure to concentrated HF expert medical attention should be sought. The measures below are only sufficient to prevent further exposure, not treat existing burns/toxicity. Exposure to HF does NOT necessary lead to pain prior to extensive tissue damage.
Immediately separate the victim from the HF spill. In the case of skin contact flush the area with water for 5 minutes, then immerse the affected area in 0.13% benzalkonium chloride.
If BAC is not available, or immersion is impractical, massage 2.5%(+) calcium gluconate gel into the site while wearing nitrile gloves. Wait for the arrival of medical professionals.
At the hospital treatments can include IV administration of both magnesium and calcium, as well as injection of calcium gluconate around the area of injury.
Of the two, I think I’d prefer to work with Hollywood acid. It’s just safer (provided your lab is on the top floor).
[4] No high school science teacher has eight-plus litres of HF just sitting around. It’s far too toxic, and there’s no real need for more than 100 mL or so even if a demonstration required it.
[5] Side note? The person in this video is wearing gloves and goggles, but no coat, face shield, apron, or fume hood. The fumes of HF are just as dangerous as the liquid.
[6] CaF2 has a solubility in water of about 0.016 g/L. MgF2 hovers around 0.13 g/L, and hypomagnesemia is clinically relevant.
[7] The best shoes are leather/pleather loafers, as mesh running shoes still allow liquids to drip through. Last years hush puppies can usually be found on the cheap.
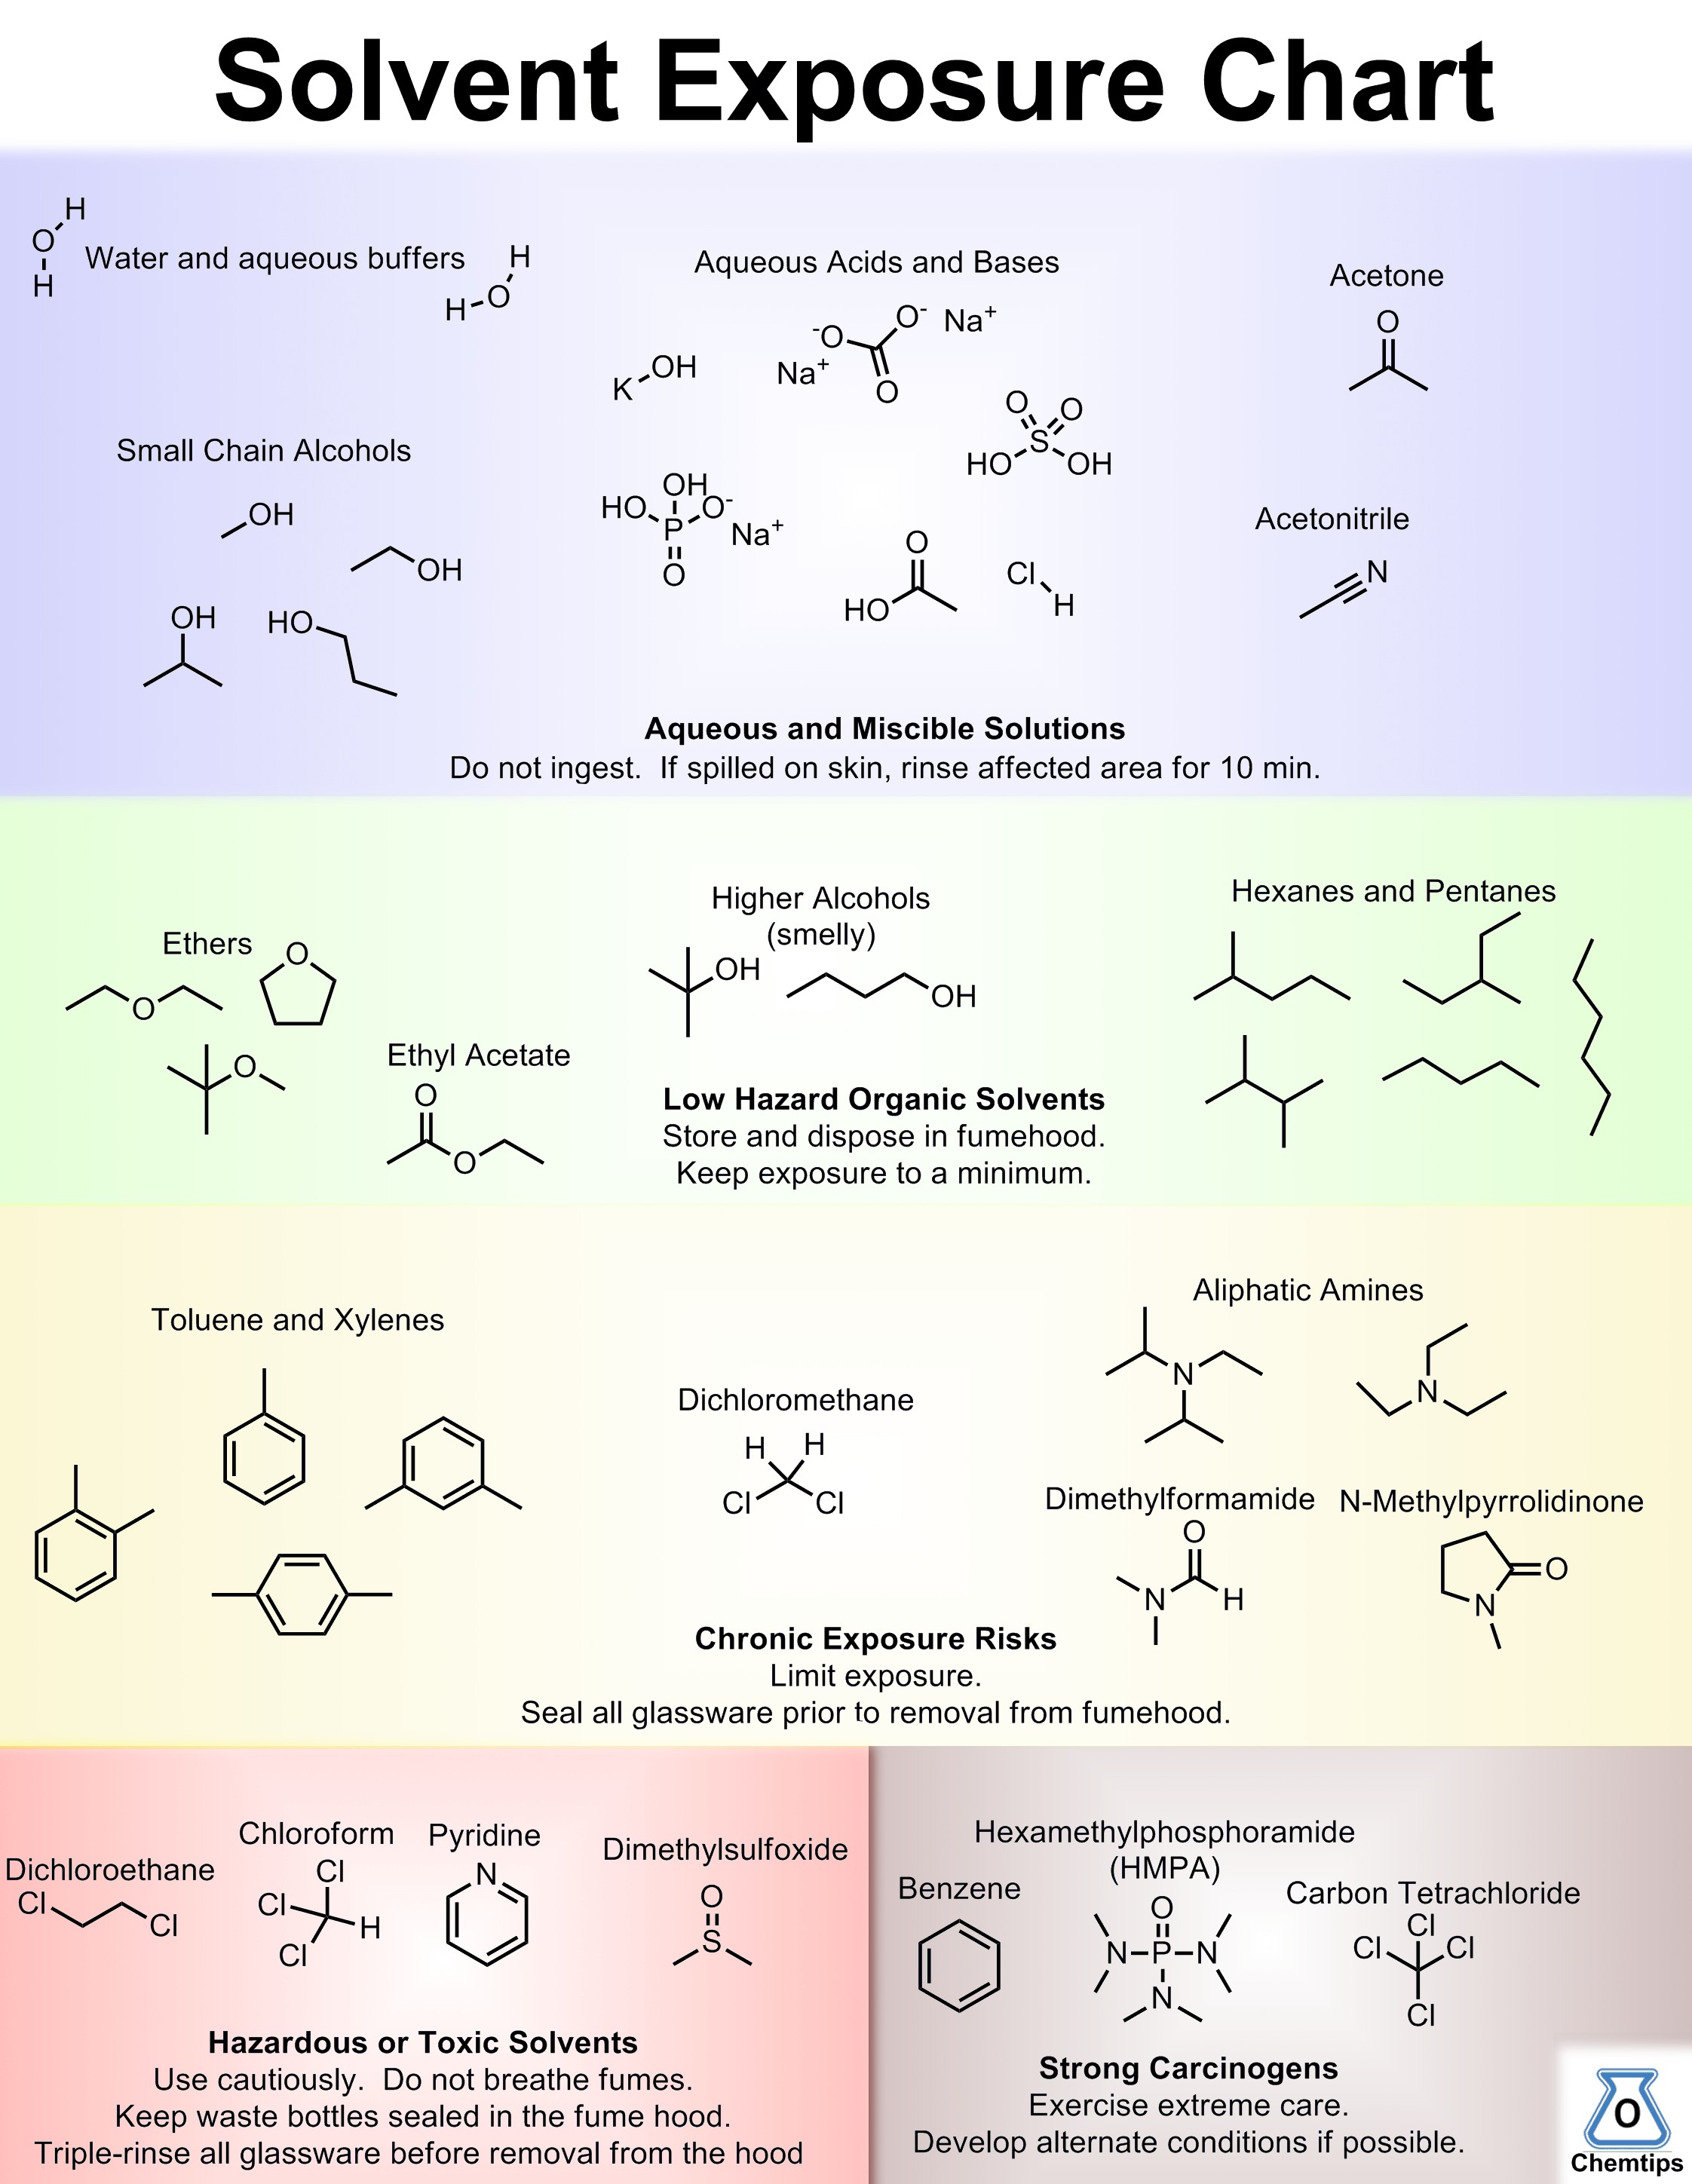
Update March 7th: I’ve upgraded the threat level of DCE. Disposal instructions have been removed, as they were too site/quantity specific. YMMV.
Here’s a little something I made for our lab, as a means of teaching incoming students appropriate solvent practices. Solvents are arranged roughly by the degree of health risk from mild (top) to severe (bottom right). Only new control measures are mentioned at each level; all preceding warnings apply.
Colour version. Click for larger, print ready image.
The same chart, in black and white. Click for larger version.
As much as possible I’ve tried to assign hazards based on available health data. If I’m missing your favourite solvent or you disagree with a label let me know in the comments.
The Birch reduction is a useful, historic and powerful transformation, and has numerous variations and applications that expand its scope far beyond the simplest case taught to undergraduate chemists around the world. Liquid ammonia might seem like an exotic, dangerous (or even scary) thing to work with but, like all reagents, it can be used perfectly safely as long as the correct procedures are followed. This isn’t a step-by-step guide for running a Birch reduction, and is not a replacement for proper training in the use of liquid ammonia, but will hopefully provide a glimpse into the practical aspects of this chemistry for those with only theoretical knowledge of it.
Tip 1: Do some reading and find a good procedure
Go and read some Organic Syntheses procedures; they’re a goldmine of trustworthy information. The Org. Synth.procedure for reduction of Anisole was penned by Birch himself, and is the best example of a ‘modern’ style Birch reaction procedure I know of. Myers’ notes on the reaction (pdf) give a nice review of the theory and applications. It isn’t easy to predict which metal (Ca, Li, Na, K…) is best for your substrate, so have a look in the literature to find conditions used on something similar looking.
Lithium or sodium are usually best. Remember how to work with those?
It’s also a good idea to talk to people, and find someone who’s done one to help you the first time. I watched a documentary a couple of years ago about a guy who wanted to take up the notoriously dangerous sport of BASE jumping; he simply borrowed a parachute from a skydiving friend of his, went out alone to a cliff with no idea what he was doing and jumped off it. He survived, just. Don’t be that guy [2].
Tip 2: Choose the right setup
Below is the setup I recently used for the small-ish scale (500 mg) Birch alkylation of an aryl ester with lithium as the metal. Obviously, your mileage may vary. The Birch alkylation is very similar to the Birch reduction; the main difference is in what is used to quench the anions generated in the reaction. In a Birch reduction, the reaction is normally done with a proton source (usually t-butanol or ethanol) present in excess, so that the carbanions formed during the reaction get protonated straight away. Conversely, in a Birch alkylation, only one equivalent of proton source is present, and this only mono-protonates the dianions generated in the reaction. This means that, in the case of aryl esters, you’re left with an enolate, which can be alkylated with alkyl halides etc. In this case I used iodomethane, but most alkyl bromides and iodides work fine. Surprisingly, liquid ammonia is a great solvent for alkylations!
As you might imagine, Birch alkylations are a bit harder to do as they’re much more sensitive to water and impurities in the ammonia, and they require considerably more care than the classic Birch reduction, which is actually a pretty robust and tolerant reaction. In the photo below I have my glassware assembled and cooling under nitrogen after a night in the oven. On the left is my drying flask where I’ll condense my ammonia and dry it with some sodium before distilling it over into my reaction flask on the right. More on this below (See Tip 4).
The ammonia inlet is just a short pipette stuck through a quickfit thermometer adapter. You can also use a needle and septum for this, as long as the needle has a sufficiently wide bore. DO NOT use a regular narrow bore needle here, unless you’re very confident in your ability to regulate ammonia pressure, and even then it will take ages. Ordinary condenser tubing is used to connect this flask to the reaction flask. I’ve use a quickfit tube adapter on the left and another pipette/thermometer adapter combo on the right.
Note: If you’ve never used it, ammonia comes in pressurised cylinders of various sizes; all the ones I’ve used have been large, heavy and trolley mounted. Sometimes you get the option of dispensing liquid or gaseous ammonia depending on how you orientate the cylinder. On our trolley mounted one you can ‘select’ which you get by rotating it. It doesn’t really matter whether you’re dispensing liquid or gas, although liquid is considerably faster and is better if you need more than 100 mL or so. Remember that liquid ammonia is a cryogen and often makes the tube connecting the cylinder to the reaction cold and brittle.
Personally, I do not use a trap to stop escaping ammonia. If I’m using my nitrogen line (as I am here), any ammonia that gets past the condenser goes through my (mineral oil) bubbler into the back of my fumehood. For large Birch reductions or the preparation sodamide I often just have a tube going to the back of the fumehood. In any kind of working fumehood this is fine.
Tip 3: Beware of pressure
Ammonia cylinders vary a lot. I’ve use a couple of different ones, and they all have really stiff taps that are difficult to open just a little bit. The first ammonia to go into your flask will just vaporise, causing a pressure spike that can make things pop out of place, even if they’re Keck clipped in place. For this reason it is absolutely vital that you clamp the end of the tube from the ammonia cylinder inside your fumehood. Someone in a lab I used to work in didn’t do this and opened the tap too far, causing the tube to fly out of the flask and spray ammonia all over the floor. The chemist was fine, but we evacuated the lab for a couple of hours while the smell dissipated.
Personally, I always have a three neck flask for my drying flask and remove the septum (see above photo) before opening the ammonia tap. Then there’s no risk of pressure spiking and popping things out of place (like an expensive dry ice condenser). Once you get the flow how you want it then you can loosely put this septum back. If I didn’t have a drying flask I’d probably take my condenser out the first time I opened the tap. You get the idea.
Tip 4: Dry and distill your ammonia
One really important tip for reproducible yields when using dissolving metals in liquid ammonia is to make sure that your ammonia is dry and iron free. Even trace iron from the inside of your ammonia cylinder can have a dramatic effect on the rate at which various metals dissolve, dramatically affecting the reaction. Ever see a procedure using freshly prepared sodamide (NaNH2)? Chances are, if it’s a good one, it’ll use a pinch of an iron salt to speed up formation of the base. However, if your aim is to have a nice blue solution of dissolved electrons, this is bad. This is ESPECIALLY IMPORTANT FOR SODIUM, which is much more affect by the presence of iron than lithium [3].
Using the reaction setup shown above I collected 50-60 mL or so of liquid ammonia in my first flask and dried it with a few small pieces of sodium:
The fact that the ammonia goes blue straight away shows that it’s already pretty dry, which is good, but I’ll still stir it for 5-10 mins before use.
Tip 5: Ammonia has a massive latent heat of vaporisation
This means that it takes a long time to evaporate [4]. With a flask full of nice, dry ammonia it’s now time to distil the required amount into our reaction flask. The receiving/reaction flask is now cooled in a dry ice-acetone bath and the dry ice condenser is also filled with the same mixture. The cylinder is disconnected, the drying flask is removed from its cooling bath and… nothing happens! [5]
For this reaction I simply left the setup as it is in the photo and timed how long it took to distil the 40 mL of ammonia I needed across into my reaction. It was a little over two and a half hours. For this reason, particularly on large scale, I usually gently warm the drying flask with a heatgun at this point. This might seem silly, but it does expedite things somewhat.
Tip 6: Allow enough time
Once you’ve got substrate, ammonia, co-solvent and proton source in the reaction flask, things don’t take too long. These reactions are a little tricky to TLC (although it can be done), but fortunately, colour is a really reliable guide here. Most people know that metals dissolving in ammonia give an incredible dark blue solution (like the colour of my drying flask in the photo above). This is due to the presence of solvated electrons as the metal dissolves. While there’s still starting material left, all the electrons very rapid go into reducing that, so as you add the first pieces of metal, nothing really happens. Only when all the starting arene has been consumed will there be excess electrons to give the blue colour, and that means that the reaction is done.
By way of illustration, here’s a video of my Birch alkylation in action. I’ve got everything in the flask and I slowly add the lithium piece-wise. At first, not much happens, but the last piece causes the solution to change colour, indicating all my starting material has gone [6]. I stir the reaction mixture for another 30 seconds or so and then add my electrophile (MeI) as a THF solution. The video is completely unedited (yes, really), and you can see that it’s all over in a few minutes, even though I get my last piece of lithium stuck to the side of the flask!
Of course setting up, drying and distilling, and warming up to room temperature afterwards can take hours, but at least you can do other stuff at the same time.
Tip 7: Finishing up
So you’ve successfully run the reaction, and you’ve just quenched it. Now what? Providing that your substrate is not air sensitive, and won’t mind a little longer in ammonia, the easiest thing to do is just leave the reaction in a cork ring in the back of the fumehood overnight for the ammonia to evaporate (See Tip 5). You don’t want to work it up with any ammonia in, because it will stink. If you’re not so confident in the stability of your product, you can remove ammonia in an hour or two just by blowing nitrogen through the reaction mixture. For the above reaction, I used another pipette in a thermometer adapter to pass nitrogen through my reaction mixture and had a piece of tube running from the other neck in my two-necked reaction flask (replacing the condenser) to carry the ammonia/nitrogen gas to the back of the fumehood.
If anyone has any questions or tips of their own, please get in touch in the comments!
Notes
1. I can’t find a reference for this limerick, so I hope I’ve remembered it right. I believe it was attributed to Birch’s countryman (and 1975 Chemistry Nobel Laureate) Sir John Cornforth.
2. If you’re into these things, the guy was Andy Lewis (aka Sketchy Andy), world-class slackliner, occasional nudist and complete lunatic. The film was great.
3. Sodium is way more susceptible to iron impurities than lithium. By about 25 times. From Fieser and Fieser, page 55:
Regarding the superiority of sodium, I’ve usually found lithium to be at least as good, and easier to work with. My experience has generally been that lithium is much better for naphthalenes, which are mostly what I’m into at the moment.
4. A (possibly apocryphal) story I heard from an emeritus professor who knew Birch when he was at Oxford relates how he used to get his liquid ammonia from a nearby chemical company for free as part payment for some consulting he did. All he had to do was provide his own vessel to take it away in. Fortunately, as ammonia evaporates quite slowly, he used to just get a couple of large glass carboys (the kind you use to make wine) and fill them up with liquid ammonia. He’d then wrap them in cotton wool, balance them carefully in the back seat of his car and drive quickly across town with the windows wound down and the ammonia happily sloshing around behind him. Rather him than me.
5. Tip 5.5: Leave the end of tube from the ammonia cylinder in the fumehood for a good hour or so after you disconnect. The smell of ammonia is strong, lingering and unpleasant!
6. The metal is usually added a piece or two at a time, and will dissolve faster if the pieces are pressed flat using a spatula to maximise their surface area. It’s especially important not to use a large excess if you have other reducible things present in the molecule (e.g. esters, other olefins etc).